
8-Bit Tower Defense Greenfield Outpost Normal Guide: Acts 1–5
Clear Greenfield Outpost’s first five Acts by matching your squad and placement to each map. These Normal routes cover road defense, Act 3’s two entrances, Act 4’s pond and junction, and a two-player Act 5 setup.
Use Honey Bee, Poison Dart Frog and Glacier Penguin through Acts 1–3, or build around Quill Porcupine for armor piercing. In Act 3, cover both entrances at their central junction and keep damage beyond it. For Act 4, use King Slime with Quill Porcupine below the pond and Lantern Jellyfish near the junction. In the two-player Act 5 route, place Quills inside the road loops and upgrade King Slime through Slime Emperor during the final fight.
Choose a Squad for Your Available Units
Open PLAY → STORY, select Greenfield Outpost, choose your unlocked Act and set the difficulty to NORMAL. Each victory opens the next Act.
Choose a route using units you already own:
- Honey Bee, Poison Dart Frog and Glacier Penguin — Acts 1–3. Bee supplies fast attacks and air coverage, Frog stacks armor-ignoring poison, and Penguin freezes groups. This is a practical choice when you need both damage and control in three slots.
- Glacier Penguin, Web Spider and Pill Bug — Acts 1–2. Combine freeze, slowing webs and knockback. Put Spider near the entrance so its control keeps enemies within your attacking coverage. Develop Penguin’s damage as the waves become tougher.
- Quill Porcupine with close-range support — Act 2. Build up to four Quills, then add melee units beside the road. For Act 3, use Quill Porcupine, Spine Hedgehog and Blade Mantis: Quill handles armor, while the other two cover enemies around the central bottleneck.
- King Slime, Quill Porcupine and Lantern Jellyfish — Act 4 and the two-player Act 5 route. Slime summons meet incoming enemies, Quill covers several road segments, and Jellyfish supplies air-capable damage.
The stage specifications below apply to Normal; Act 5’s route and specifications use a two-player battle. For broader role substitutions, see team building and early story squads.
5 objects
| Name | Act | Waves | Starting cash | Base HP |
|---|---|---|---|---|
|
1
|
8 waves (Normal)
|
1,000 Cash (Normal, solo)
|
150 HP (Normal)
| |
| ||||
|
2
|
10 waves (Normal)
|
1,000 Cash (Normal)
|
150 HP (Normal)
| |
| ||||
|
3
|
12 waves (Normal)
|
1,000 Cash (Normal)
|
150 HP (Normal)
| |
| ||||
|
4
|
15 waves (Normal)
|
1,000 Cash (Normal, solo route)
|
150 HP (Normal)
| |
| ||||
|
5
|
15 waves (Normal, two-player battle)
| — |
150 HP (Normal, two-player battle)
| |
| ||||
Cover the Road and Defeat Scarecrow in Act 1
Build coverage along the road before Scarecrow arrives on wave 8 with 320 HP in solo Normal.
- Choose your opening. Place Honey Bee and Poison Dart Frog beside the road, then add Glacier Penguin when you can afford it. With the control squad, start with Penguin for $850 from your $1,000 starting cash and add Spider and Pill Bug as funds arrive.
- Extend coverage by wave 3. Runners move quickly, so give your units more road to attack along. Position Penguin farther along the route than your opening damage units. If the placement preview says Too close to the path, move it back onto valid ground.
- Buy useful early upgrades. Penguin’s Packed Snow costs $450 and increases range and snowball size; Ice Core costs $1,000 and strengthens its freezing attacks. Bee’s Busy Wings costs $300, followed by Sharp Sting for $400. Spend as cash becomes available while keeping the route covered.
- Keep Scarecrow under fire through the final wave. The Bee, Frog and Penguin route can clear with Penguin at 2/5 upgrades. You do not need to save $2,000 for Belly Slide before this boss.
For the control opening, keep Web Spider near the entrance so enemies encounter its slow before passing your main damage. A forward Spider is more useful here than one sitting beyond the fighting area.
Defeating Scarecrow unlocks Act 2. Select PLAY NEXT after victory to continue.

Keep Rear Damage for Old Croaker in Act 2
Place your opening damage near the bend, then add a second engagement area farther along the road. That rear coverage catches split enemies and gives you more time to attack Old Croaker, who arrives on wave 10 with 640 HP in solo Normal.
Prepare for the late waves
| Wave | Threat | Response |
|---|---|---|
| 5 | Armor | High damage or armor piercing |
| 7 | Shields | Explosions or Salamander |
| 9 | Bloaters | Downstream damage |
| 10 | Old Croaker | Front and rear coverage |
Armor resists weak attacks. Shields absorb damage before the enemy’s health is exposed, making explosions or Salamander useful if you have them. Bloaters release fast Crawlers when killed; place rear damage beyond the area where the parent enemies die. See enemy types and counters for their wider mechanics.
Glacier Penguin route
- Open with damage near the bend and place Penguin farther down the route.
- Buy Packed Snow for $450, then Ice Core for $1,000.
- Buy Belly Slide for $2,000 to hit enemies along a stretch of road and freeze them for 1.5 seconds. Choose a position where that stretch overlaps the enemy route.
- Keep the front line thinning the pack while the rear units attack Old Croaker as it advances. Hailstorm costs $2,200 and takes Penguin to 4/5; it is a further damage investment during the boss fight when funds allow.
This upgrade route also works with the Web Spider and Pill Bug control squad.
Quill and melee alternative
Deploy Quill Porcupine up to its four-unit limit, then spend on melee support beside the road instead of attempting a fifth Quill. Preserve the rear engagement area so Crawlers still face attacks after escaping the opening defense.
First clear and replay rewards
The Normal Story panel lists 90 Gems for the first clear and 30 Gems for replays. A first-clear reward example includes 750 Gold, 90 Gems, 100 Tide Pass XP and 270 XP per squad unit. A replay completion gives 100 Tide Pass XP and 180 XP per squad unit.
Defeating Old Croaker unlocks Act 3.

Defend Both Entrances in Act 3
Act 3 has two entrances on the left. Their roads join near the center before continuing toward the base. Build around that merge so your opening investment can attack enemies from either approach, then extend coverage beyond it.
- Open at the junction. Place Quill Porcupine between the two incoming roads, or put Glacier Penguin near their merge. Use the range preview to check coverage of both approaches.
- Add supporting damage around the bottleneck. With Penguin, cover the approaches using Honey Bee and Poison Dart Frog. With Quill, add Spine Hedgehog and Blade Mantis where enemies pass through their shorter attack areas.
- Keep a downstream defense. Enemies that survive the junction, split into Crawlers or gain a speed boost need another stretch of attacks before reaching the base.
- Upgrade before the final wave. Improve your central units’ range and damage rather than filling every position with unupgraded units.
Key waves
| Wave | Threat | Priority |
|---|---|---|
| 1 | Armor | High damage or armor piercing |
| 3 | Shields | Explosions or Salamander |
| 5 | Bloaters | Crawler cleanup |
| 7 | Grave Priests | Kill healers first |
| 9 | Howlers | Coverage beyond the junction |
| 12 | Blightbough | Boss and smaller enemies |
Grave Priests heal nearby Hollow, so prioritize them when they support a pack. Howlers speed up nearby enemies; keep damage and control working beyond the merge so the faster group does not immediately escape your defenses.
Penguin upgrade priorities
Build through Packed Snow ($450), Ice Core ($1,000) and Belly Slide ($2,000). Belly Slide adds a road-length attack and a 1.5-second freeze, making the merge a useful place to catch grouped enemies. Support that control with Bee’s Busy Wings ($300) and Sharp Sting ($400), plus Frog’s Bright Skin ($950) as funds permit.
Quill upgrade priorities
Buy Long Quills ($450) for range and attack speed, then Hard Quills ($950) for stronger damage. Quill Burst ($1,900) is the third upgrade and adds a cone attack that can hit flying targets. Spine Hedgehog gains air coverage through Longer Spines ($1,150). Plan those upgrades when relying on this squad for air coverage.
Beat Blightbough
Blightbough arrives on wave 12 with 640 HP in solo Normal. Keep the tree-shaped boss inside the central defense while supporting units handle the smaller enemies it summons. Maintain coverage of the road beyond the boss fight so those enemies cannot slip through.
Winning unlocks Act 4 and access to Tide Titan. The Normal first-clear panel lists 100 Gems. For the separate world-boss encounter, use the Tide Titan guide.

Build Pond and Junction Coverage in Act 4
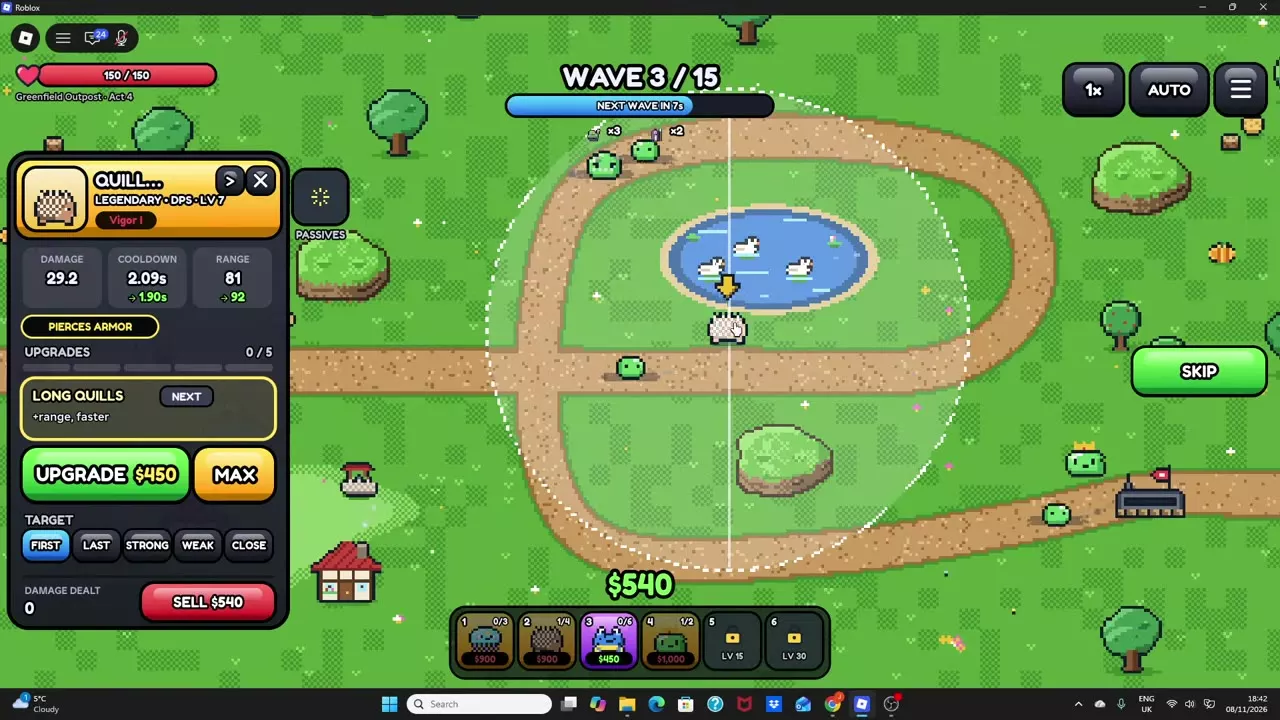
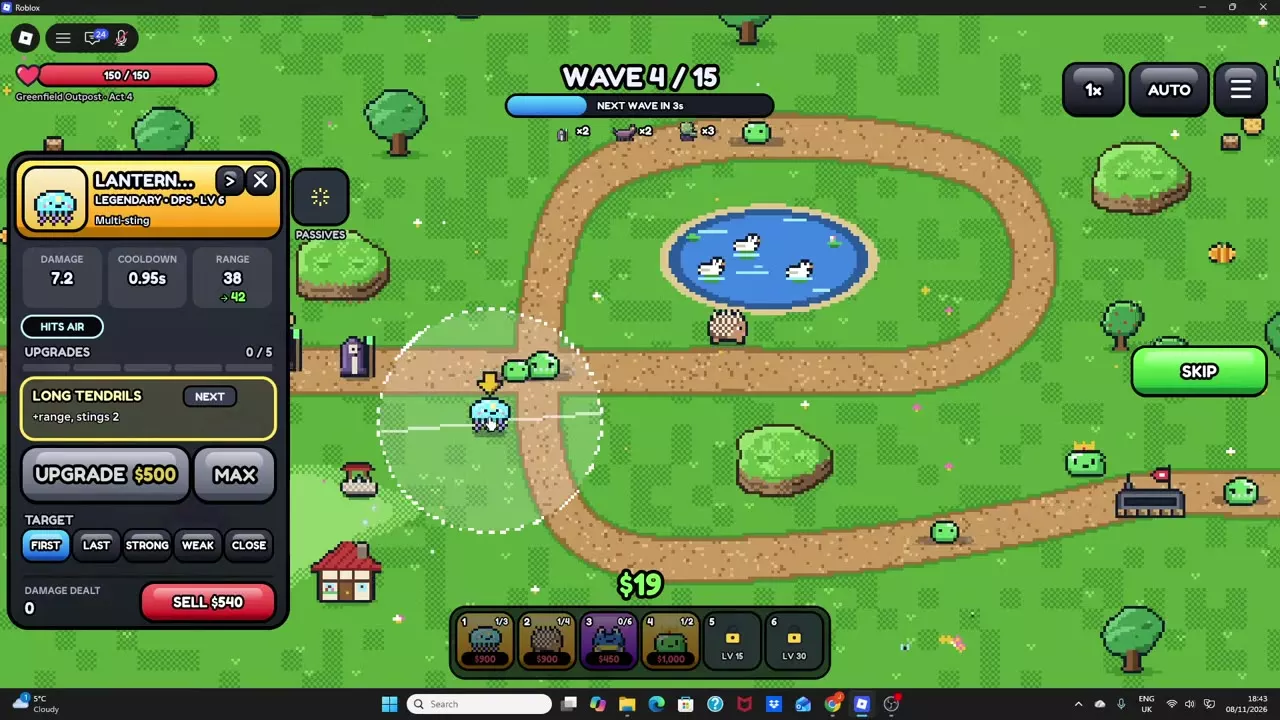
Use King Slime, Quill Porcupine and Lantern Jellyfish for this solo Normal route. The pond creates a strong long-range position, while the nearby junction gives Jellyfish a useful area to cover.
- Open with King Slime for $1,000. Its Slimelings travel along the road against incoming enemies. Choose a position near passing enemies so the King’s own attack can contribute after Royal Guard is unlocked.
- Prepare rear coverage from wave 1. Bloaters already appear here and release fast Crawlers when killed. Add downstream damage as cash becomes available rather than concentrating every attack at the entrance.
- Place Quill below the pond. Its range reaches several road segments from this position. Buy Long Quills for $450 to expand that coverage.
- Place Jellyfish on grass near the junction. It can hit flying enemies. Long Tendrils costs $500 and increases range. Use the grass beside the road: air targeting does not make Jellyfish a valid hill placement, and raised terrain can return Hills are for flying units.
- Expand and upgrade the defense. Build toward four Quills and three Jellyfish as funds allow. Keep their attack areas overlapping the pond roads, junction and downstream route.
- Develop King Slime’s summons and attack. Buy Bouncy Slimes ($600), Slime Scouts ($1,300) and Royal Guard ($2,500). Before Royal Guard, the King contributes through its summons; Royal Guard lets it attack nearby enemies directly.
- Continue attacking through wave 15. Grim Gander has 915 HP in this solo Normal battle. Keep the surrounding defense active until the boss and remaining enemies are defeated.
Victory unlocks Act 5. This setup can finish all fifteen waves without leaks.
Use the Road Loops in Two-Player Act 5
This route uses two players on Normal, with King Slime, Quill Porcupine and Lantern Jellyfish. Each player has a separate squad and battle cash, so coordinate coverage while budgeting your own purchases. The party leader’s progress determines which Acts the party can enter; see co-op and party rules for setup.
- Open with King Slime. Howlers appear from wave 1 and make nearby enemies move faster, so establish damage along the route as cash arrives.
- Place Quill inside the right road loop. Add another inside the middle-left loop. The roads wrap around these positions, allowing ranged units to cover multiple stretches from one spot. Place on valid grass beside the rocks.
- Add Jellyfish near the left road. Use it for additional damage and air coverage. Long Tendrils costs $500 when you need a wider attack area.
- Build King Slime through its early upgrades. Buy Bouncy Slimes for $600, Slime Scouts for $1,300 and Royal Guard for $2,500. Place the King close enough to the road for its Royal Guard attack to reach enemies.
- Focus Revenants on wave 9. They recover health. Concentrate damage to kill each one quickly instead of spreading attacks across the pack.
- Invest later cash in King Slime. Buy Royal Decree for $2,900, followed by Slime Emperor for $4,200. Slime Emperor adds an attack against all targets in range with a 30% slow.
- Finish Town Crier on wave 15. Keep the loop defenses attacking while saving for the final Slime upgrade; this route completes Slime Emperor during the boss fight.
Town Crier has 1,621 maximum HP in this two-player Normal battle. That HP value applies to this party size, not solo play.
Victory unlocks Act 6. A zero-leak first-clear example finished in 5:04 and awarded 750 Gold, 120 Gems, 100 Tide Pass XP and 270 XP per squad unit. For the wider progression path, see story worlds and unlocks.

FAQ
Does HITS AIR mean a unit can be placed on hills?
No. HITS AIR describes which enemies the unit can attack. Hill placement has a separate eligibility rule. If the preview says Hills are for flying units, choose an eligible unit or move onto valid ground beside the hill. See placement rules.
Does leveling a unit unlock more squad slots?
Squad slots depend on account level, not an individual unit's level. Account levels 5, 15 and 30 unlock the fourth, fifth and sixth slots. Unit XP levels individual units, while Tide Pass XP advances the pass. See player progression.
Is a ten-pull cheaper than ten single summons?
At base prices, Featured and Standard cost 50 Gems per single or 500 per ten-pull, so the currency cost is equal. A ten-pull guarantees at least one Epic or higher. VIP reduces both prices by 20%, to 40 Gems per single or 400 per ten-pull. See summoning prices and guarantees.